
How to set up M-Pesa in Plentier ERP
Send M-Pesa prompts from your point of sale and invoices, and see payments made to your till, confirmed by Safaricom and recorded in your books automatically. Money goes straight to your own paybill or till; Plentier never handles it.
By the Plentier Systems ERP team, who built this integration · Updated · About 15 minutes in the ERP, plus Safaricom's go-live (usually a few working days).
What you get
- Prompts at the till. The cashier sends an M-Pesa prompt to the customer's phone; the customer enters their PIN and the sale shows as paid.
- Payments to your till or paybill. Customers who pay your number directly appear in the ERP within seconds, ready to apply to a sale.
- Invoices paid by phone. Send a prompt for any unpaid invoice; the payment is recorded against it automatically.
- No guessing. Nothing is marked as M-Pesa until Safaricom confirms it, so the till and your M-Pesa statement agree.
Step 1: Create an app on Safaricom's Daraja portal
Daraja is Safaricom's developer portal. Sign up at developer.safaricom.co.ke, open My Apps and create an app with M-Pesa Express (the prompts) and C2B (payments made to your till) ticked. The app shows a consumer key and consumer secret. These first keys are for Safaricom's sandbox, where you can try everything without real money.
To try it in the sandbox, use Safaricom's public test paybill 174379 and the test passkey shown on the portal under APIs → M-Pesa Express → Simulate.
Step 2: Go live with your own paybill or till
On the Daraja portal, choose Go Live, select your paybill (or, for a till, your store number) and confirm with the one-time code Safaricom sends to your M-Pesa business administrator's phone. Select M-Pesa Express. Safaricom then emails the Lipa na M-Pesa Online passkey to the business's registered email address, usually within a few working days, and your live app shows the production consumer key and secret.
Using a till (Buy Goods)? Safaricom gives you two numbers: a store (head office) number and the till number customers pay. The passkey belongs to the store number.
Step 3: Open M-Pesa in your ERP
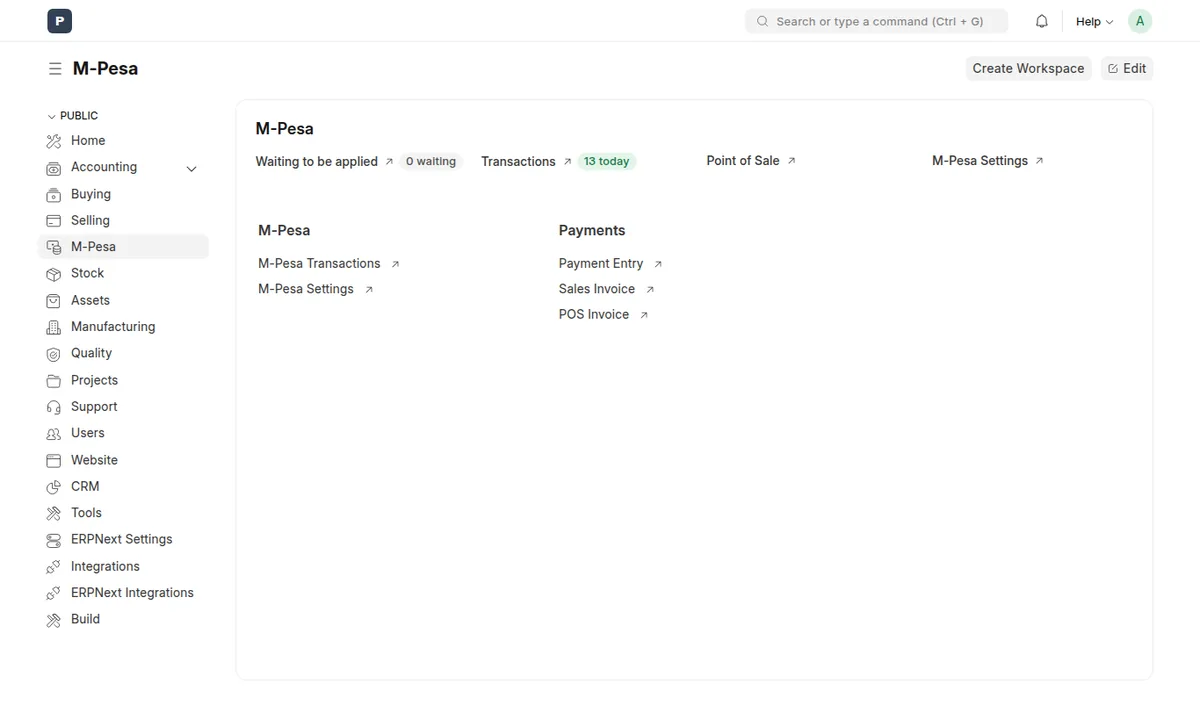
Log in to your ERP as an administrator. M-Pesa is in the sidebar (and in the menu under your initials). It shows payments waiting to be applied, today's transactions, and links to the point of sale and settings.
Step 4: Enter your details in M-Pesa Settings
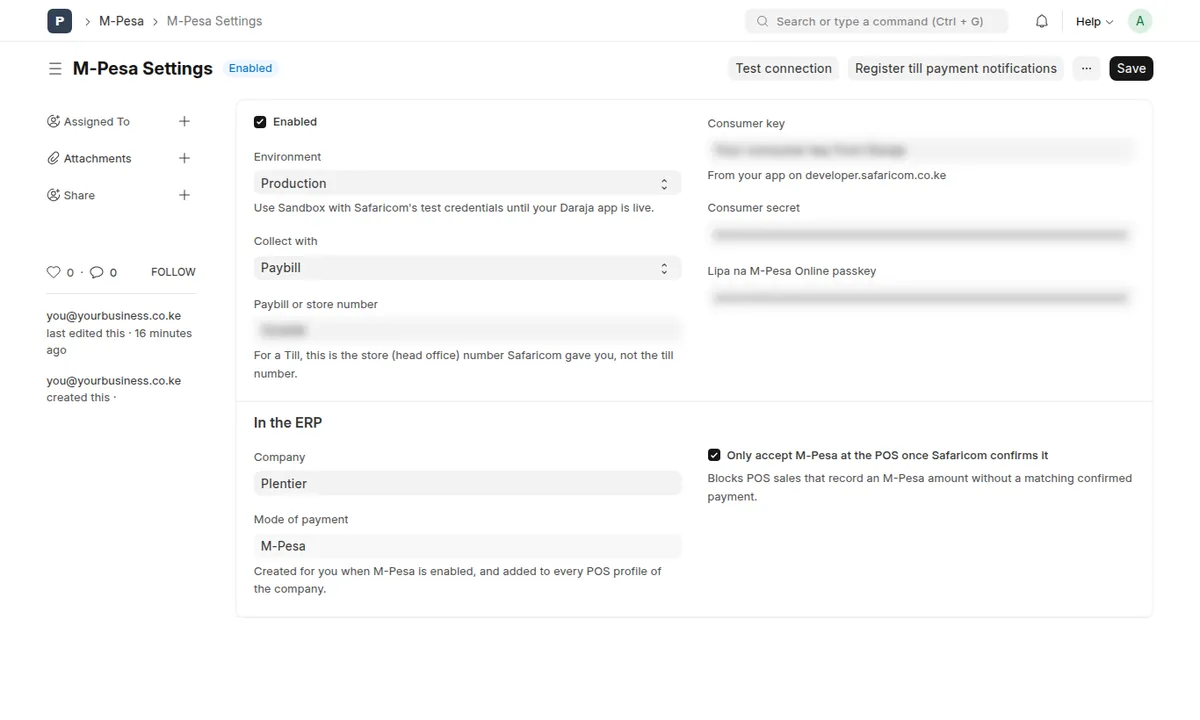
Click M-Pesa Settings and fill in:
- Environment: Sandbox while testing, Production once Safaricom has emailed your passkey.
- Collect with: Paybill, or Till (Buy Goods).
- Paybill or store number, and for a till, the till number.
- Consumer key, consumer secret and passkey from steps 1 and 2.
- Company, then tick Enabled and click Save.
Saving creates an M-Pesa payment method with its own bank account in your chart of accounts and adds it to every POS profile. Click Test connection to check the keys with Safaricom.
Step 5: Turn on till payment notifications
With production credentials saved, click Register till payment notifications once. From then on, every payment made to your paybill or till appears in the ERP within seconds. If the customer typed an invoice number as the account number, that invoice is marked paid; if they typed their customer ID or phone number, the money is recorded against that customer.
Step 6: Take M-Pesa at the point of sale
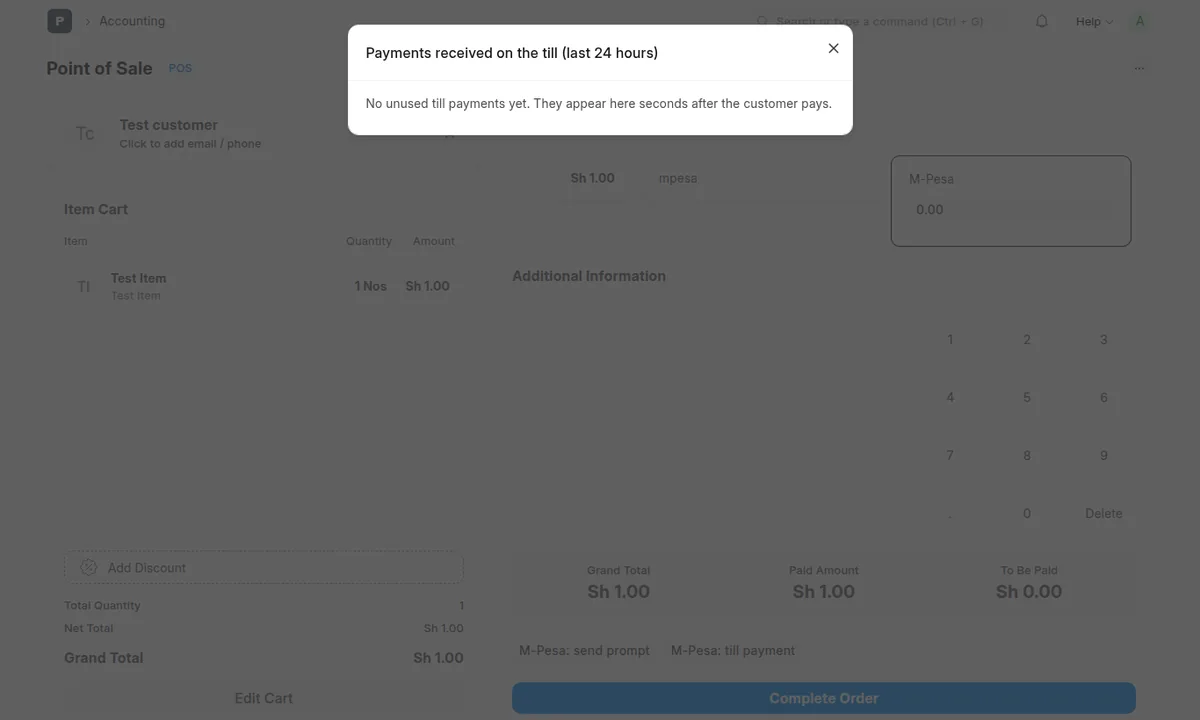
Ring up the sale as usual and click Checkout. Under the payment methods you'll see two buttons:
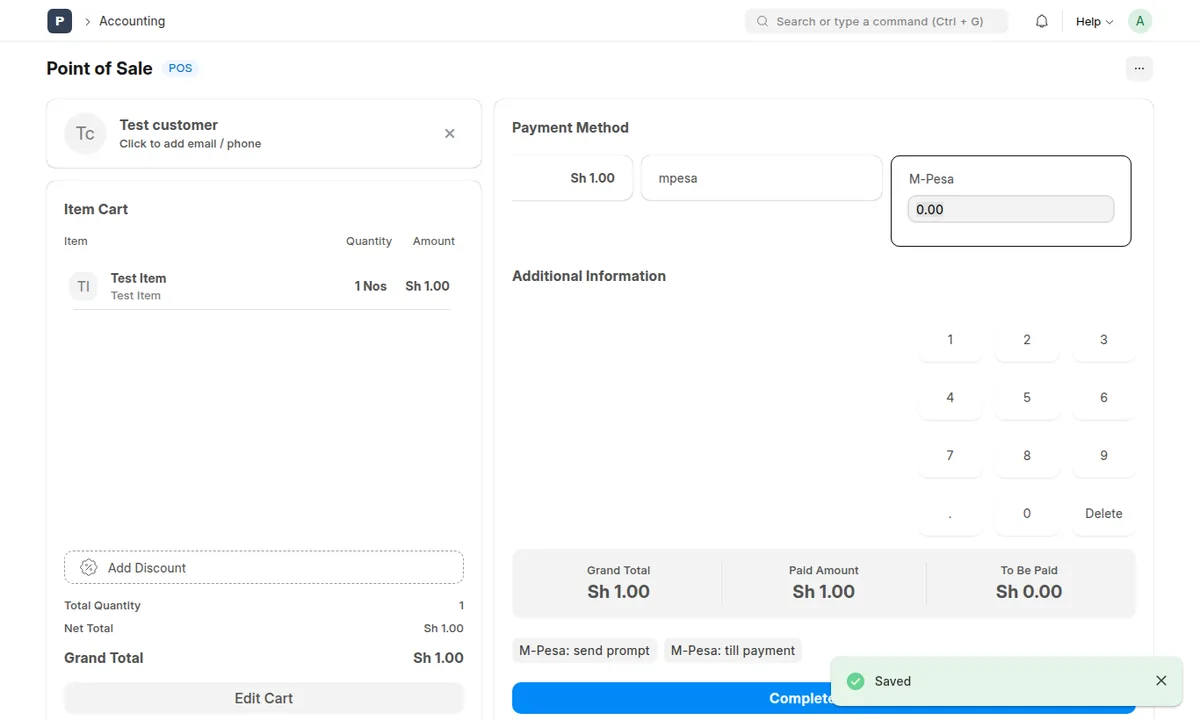
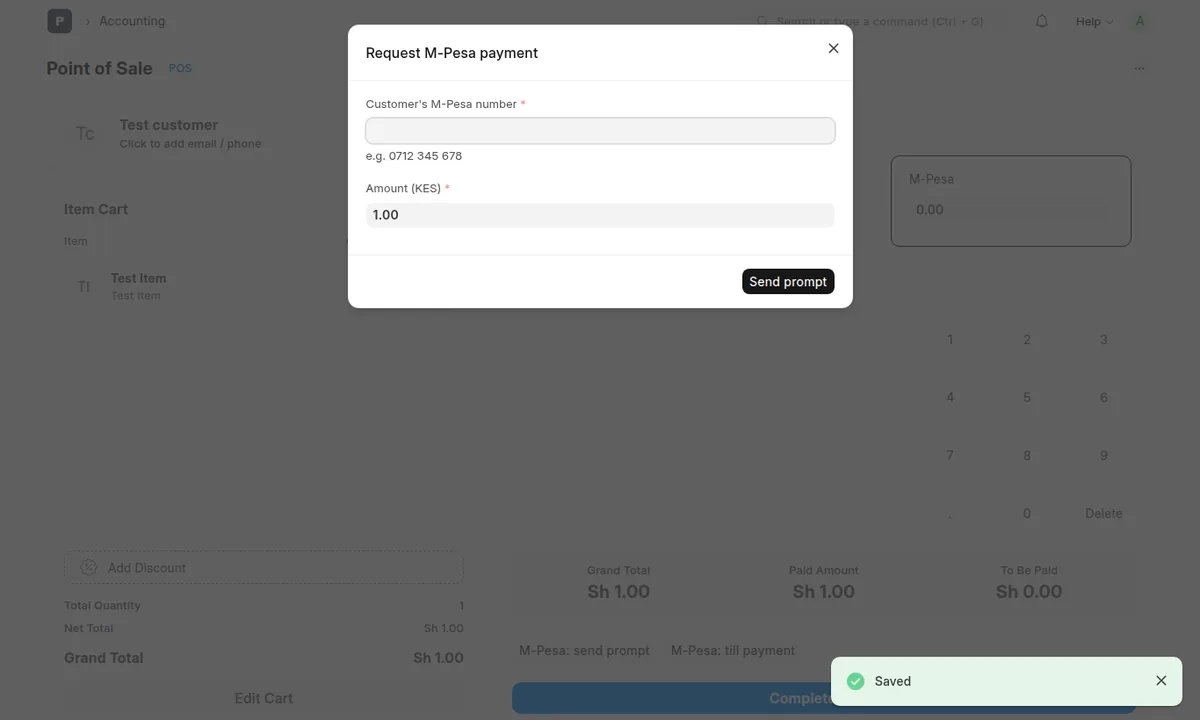
M-Pesa: send prompt asks for the customer's number (filled in from the customer record when there is one) and the amount (the sale total, less anything paid in cash or by card). The customer enters their PIN on their phone; within seconds the M-Pesa amount fills in by itself. Then click Complete Order.
M-Pesa: till payment is for customers who paid your till or paybill number themselves. Pick their payment from the list of the last 24 hours and it's applied to the sale. Each payment can only be used once.
Step 7: Request payment for an invoice
Open a submitted sales invoice that isn't fully paid and choose Create → Request M-Pesa payment. When the customer pays, a payment entry is created and the invoice's outstanding amount drops, with the M-Pesa receipt number as the reference.
Step 8: Keep track of every payment
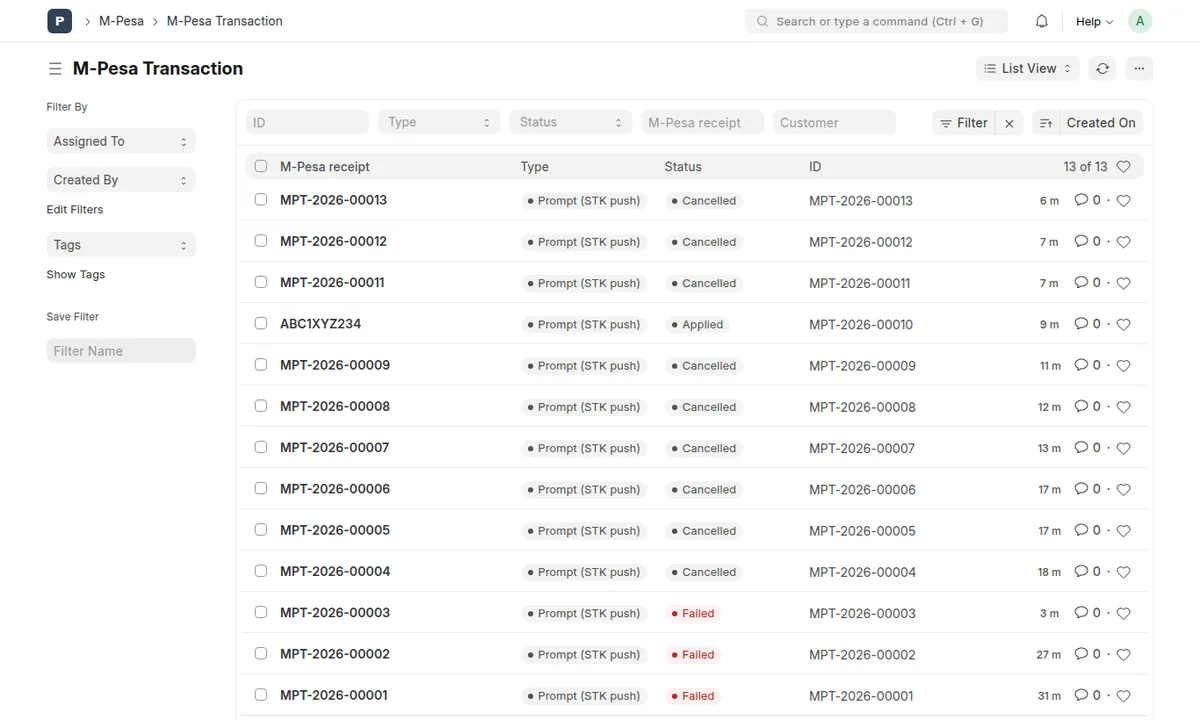
M-Pesa Transactions lists every prompt and till payment with its status: Pending (waiting for the customer), Received (paid, not yet applied to a sale), Applied, Cancelled (the customer cancelled the prompt) or Failed (with Safaricom's reason, such as a wrong PIN or not enough money).
Troubleshooting
Test connection says Safaricom rejected the key or secret.
Check that Environment matches the keys: sandbox keys only work with Sandbox, and production keys (from Go Live) only with Production. Copy the consumer key and secret again from your app on the Daraja portal, without spaces.
The customer didn't get the prompt.
The phone must be on, with a Safaricom line and M-Pesa. Check the number, then the paybill or store number and the passkey: for a till, the store (head office) number goes in “Paybill or store number” and the till number in “Till number”. Wrong passkeys are the most common cause.
The customer paid but the sale still shows nothing.
Most confirmations arrive within seconds. If Safaricom's message is delayed, the ERP asks Safaricom for the result itself within two minutes. Open M-Pesa Transactions to see the status and Safaricom's reason if it failed.
The POS says the M-Pesa amount isn't confirmed by Safaricom.
That protection stops a sale being completed as M-Pesa when no money arrived. Send a prompt, or pick the customer's payment under “M-Pesa: till payment”. An administrator can switch the check off in M-Pesa Settings.
Payments made straight to our till don't appear.
Click “Register till payment notifications” once in M-Pesa Settings (production credentials). After that, every payment to your paybill or till appears under M-Pesa Transactions within seconds.
Who can see our M-Pesa keys?
Only administrators and accounts managers can open M-Pesa Settings. The consumer secret and passkey are stored encrypted and never shown again after saving. Never send your passkey by email or chat; if it leaks, ask Safaricom for a new one.
About this guide
We wrote this guide while connecting our own paybill to Plentier ERP, and every screenshot comes from our own ERP. Keys, the paybill number, phone numbers and receipt numbers are blurred or replaced with examples. If something here doesn't match what you see, tell us and we'll update it.
Setting up the till itself? Follow how to set up the POS. New to Plentier ERP? See the point of sale and plans; M-Pesa is included in every plan.
Want M-Pesa working at your till this week?
Book a free, no-obligation consultation. We’ll review your goals and recommend a practical path forward, usually within one call.