
How to set up the POS in Plentier ERP
Set up the point of sale once, then sell from any computer or tablet: scan or search items, take cash, M-Pesa or card, print receipts, and close each shift with a cash count. Sales update your stock and accounts automatically.
By the Plentier Systems ERP team · Updated · About 20 minutes, plus the time to add your items.
The short version
- Add your items with a selling price (and opening stock if you count stock).
- Create a POS profile: which store it sells from, the price list, payment methods and cashiers.
- Open a shift with the cash float in the drawer.
- Sell: add items, take payment, print or email the receipt.
- Close the shift with a cash count; the day's sales post to your accounts.
Step 1: Add your items and prices
Open Item from the Stock workspace (or type “New Item” in the search bar) and click Add Item. For each product, fill in:
- Item code and name, for example MAIZE-2KG and “Maize flour 2 kg”. The name is what cashiers and receipts show.
- Item group (such as Products) and unit of measure (Nos, Kg, Litre).
- Maintain Stock: tick it for goods you count, with the opening stock and what each unit cost you (valuation rate). Untick it for services.
- Standard Selling Rate: the shelf price. This is what the POS charges.
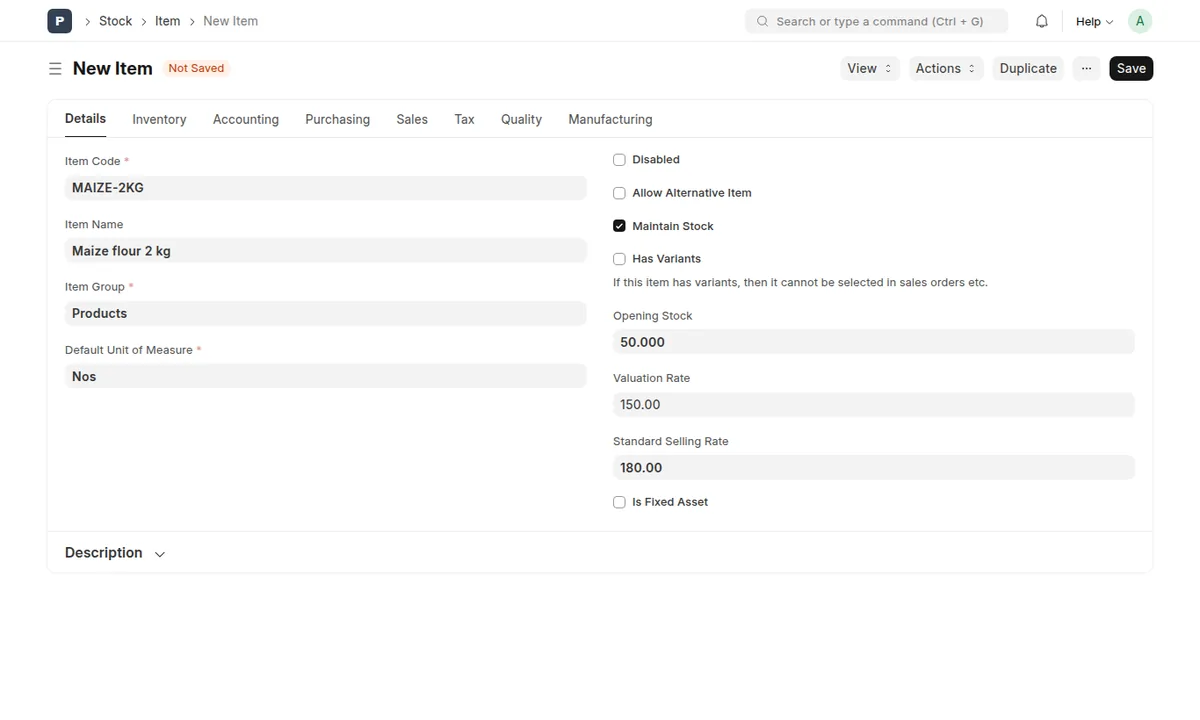
Barcodes: open the item's Inventory tab and add the barcode under Barcodes; scanning it at the till adds the item. Many items? Import them from a spreadsheet with Data Import (search for it in the search bar) instead of typing each one.
Step 2: Create a POS profile
A POS profile is the set-up for one till or shop. Type “POS Profile” in the search bar, open it and click Add POS Profile, then fill in:
- Company and Warehouse: the store this till sells from. Stock is reduced there.
- Customer (optional): a default such as “Walk-in customer”, so cashiers don't have to pick one for every sale.
- Applicable for Users: the cashiers who may use this till. Leave it empty to allow every user.
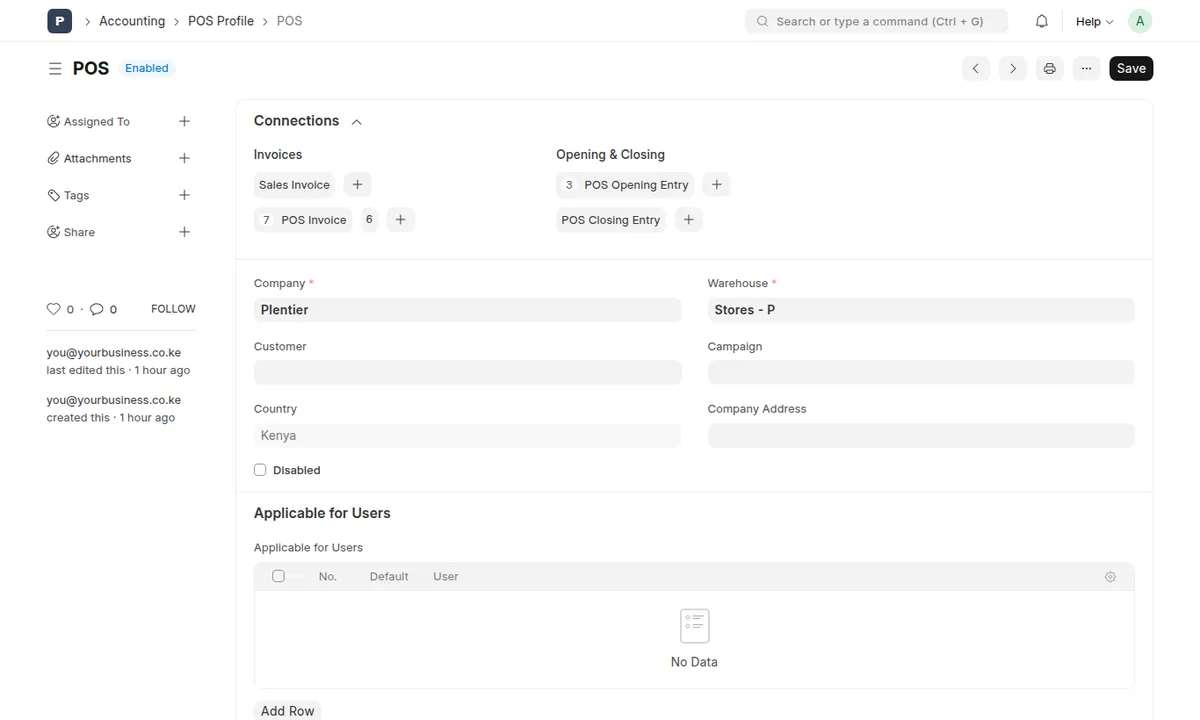
Further down, add the Payment Methods the till accepts (tick one as the default, usually Cash), and in the accounting section choose the price list (Standard Selling), and the write-off account and cost center used for rounding differences. Under Configuration, leave “Allow User to Edit Rate” and “Allow User to Edit Discount” unticked if cashiers shouldn't change prices.
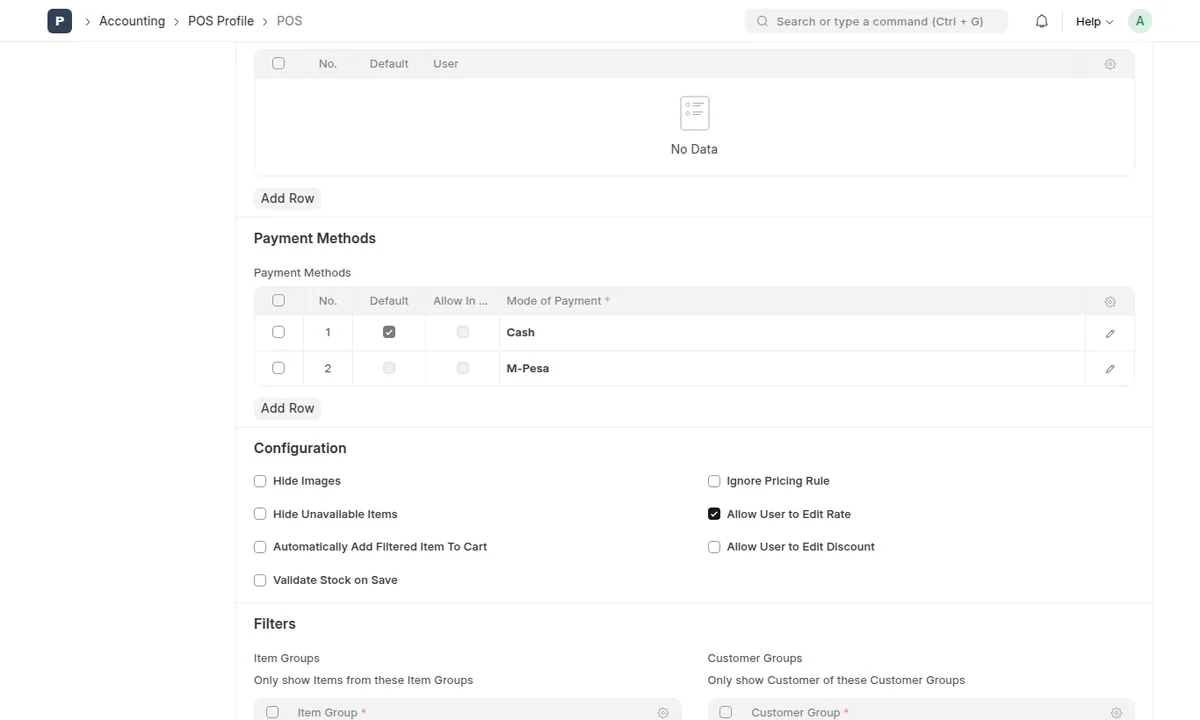
To take M-Pesa with automatic confirmation, follow the M-Pesa setup guide; it adds M-Pesa to every POS profile for you.
Step 3: Open a shift
Open Point of Sale by typing “Point of Sale” in the search bar. At the start of each shift the POS asks for an opening entry: choose the POS profile and enter the opening amount for each payment method, usually the cash float in the drawer. Click Submit.
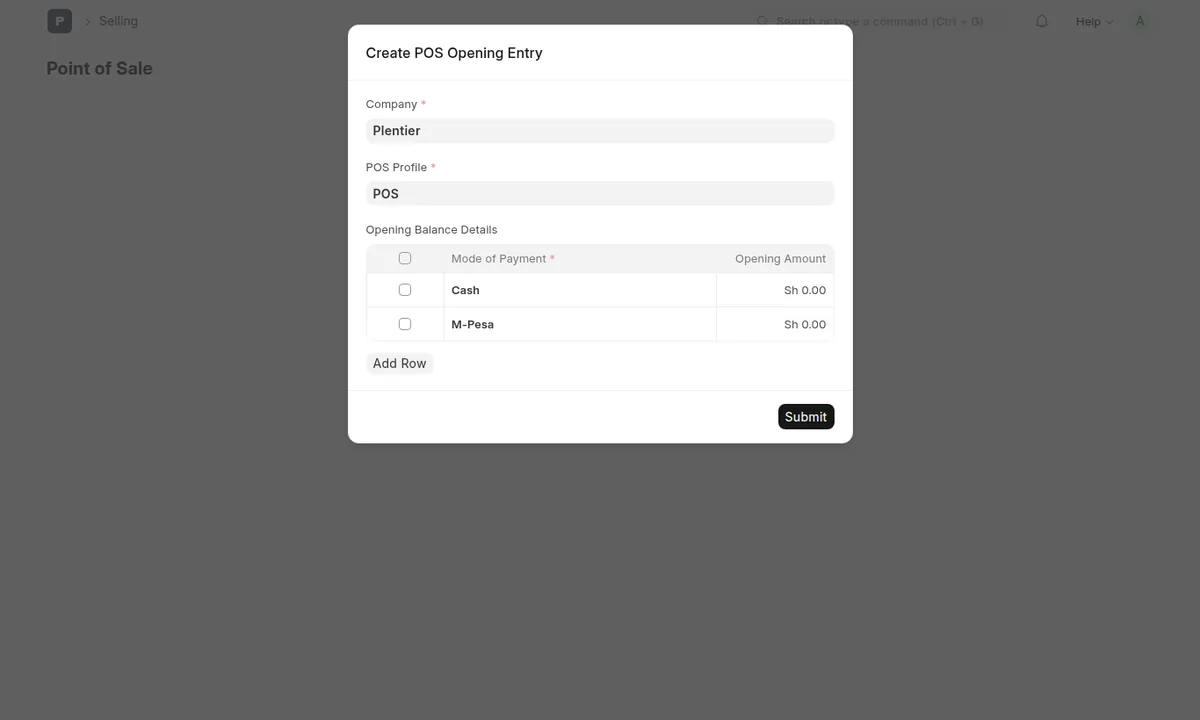
Step 4: Ring up a sale
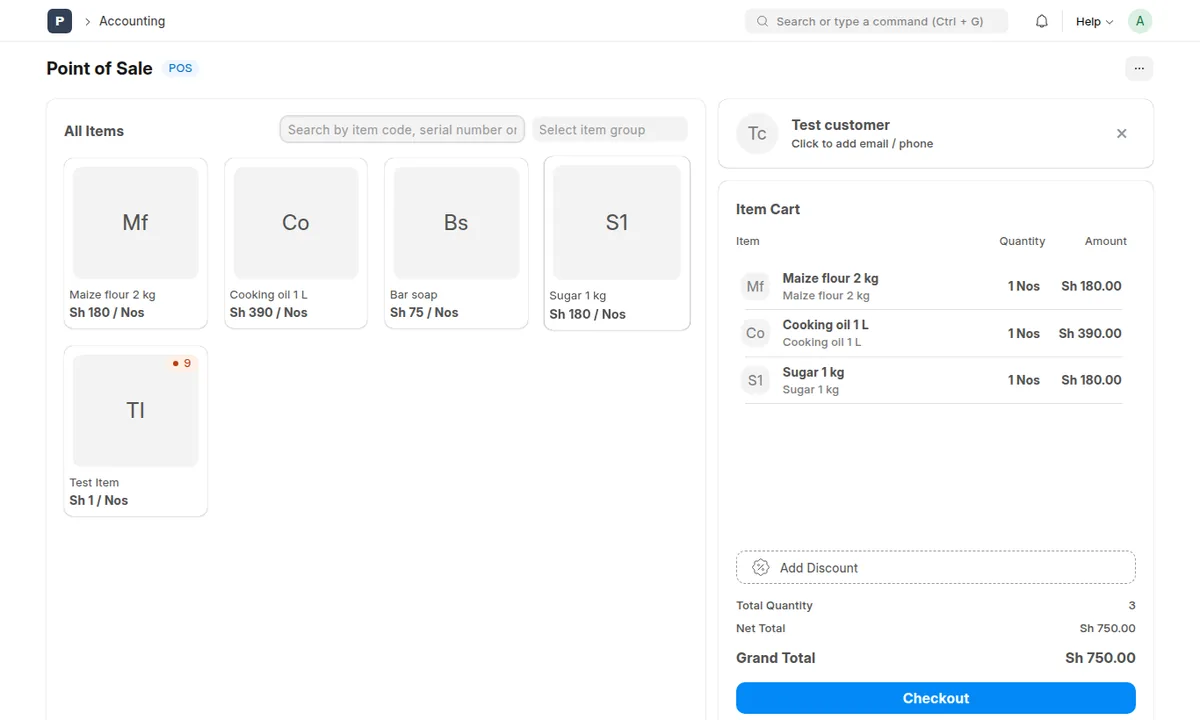
Click an item, search by name or code, or scan its barcode; it lands in the cart with its price. Change the quantity in the cart, pick the customer at the top (or keep the default), and add a discount if your profile allows it. When the cart is right, click Checkout.
Step 5: Take payment
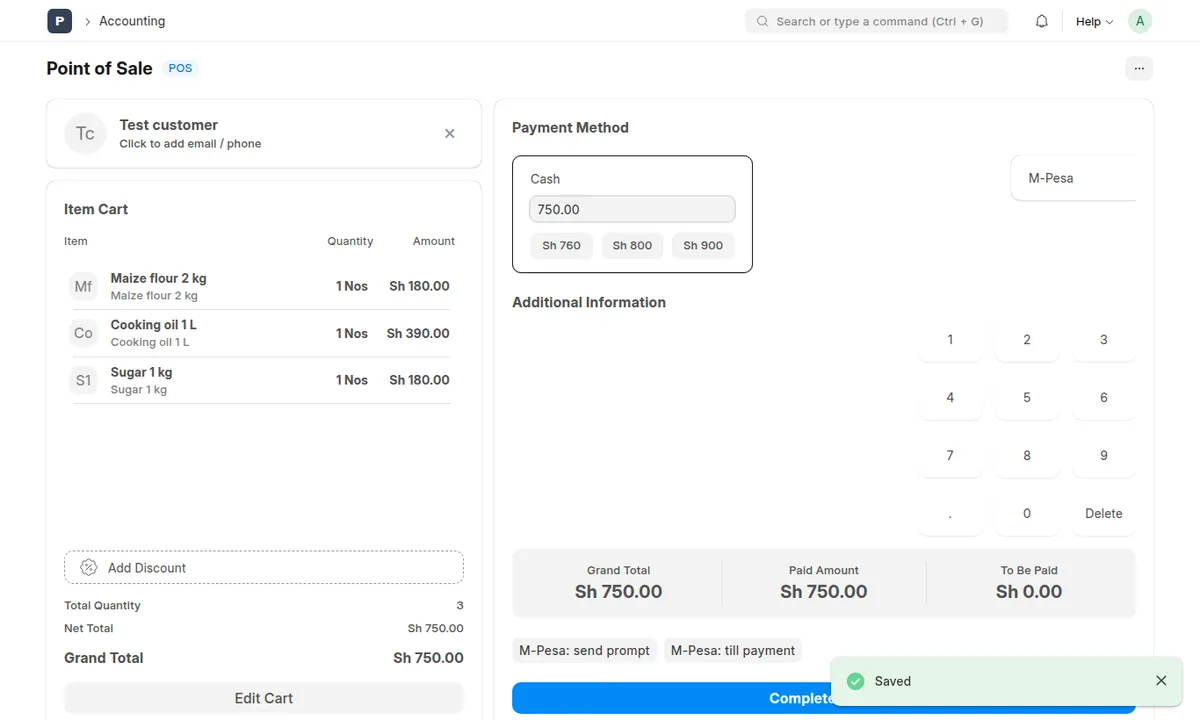
Choose the payment method. For cash, type the amount received or tap a shortcut (such as KES 800) and the POS shows the change due. A sale can be split, for example part cash and part M-Pesa. With M-Pesa set up, M-Pesa: send prompt sends the PIN prompt to the customer's phone and fills in the amount once Safaricom confirms. Then click Complete Order.
Step 6: Print or email the receipt
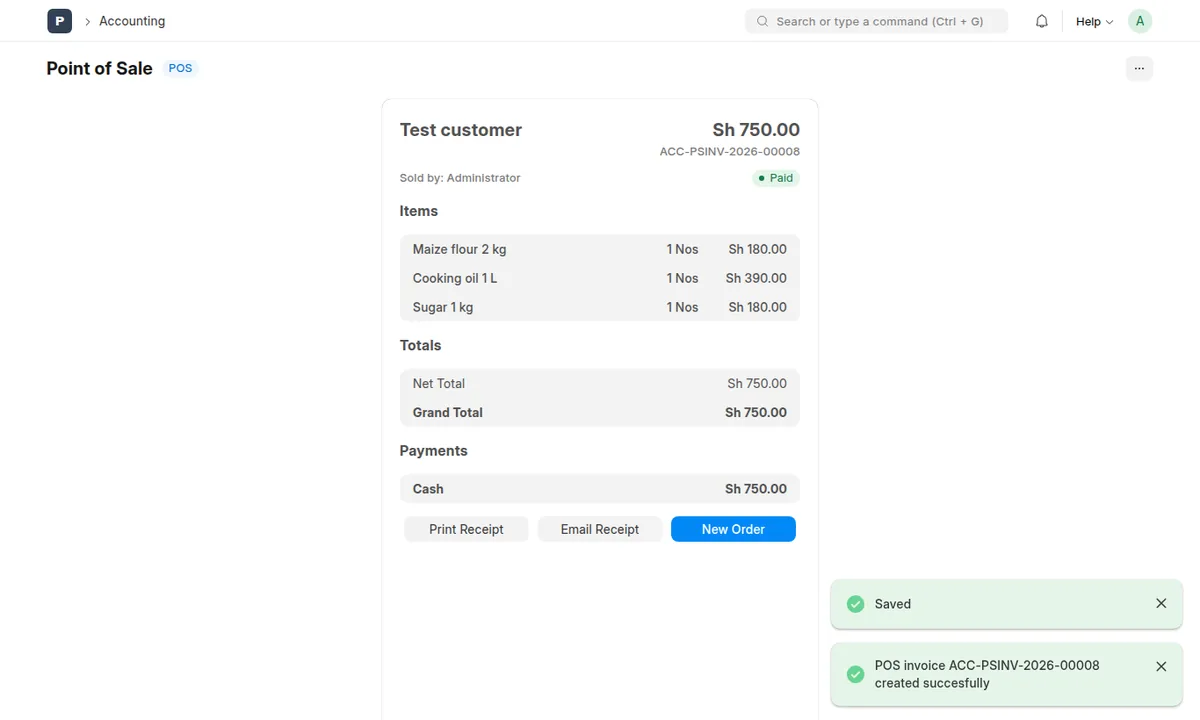
The completed sale shows its items, totals and payments. Click Print Receipt to print on a receipt printer (80 mm thermal printers work through the browser's print dialog), Email Receipt to send it to the customer, or New Order for the next customer.
Step 7: Close the shift
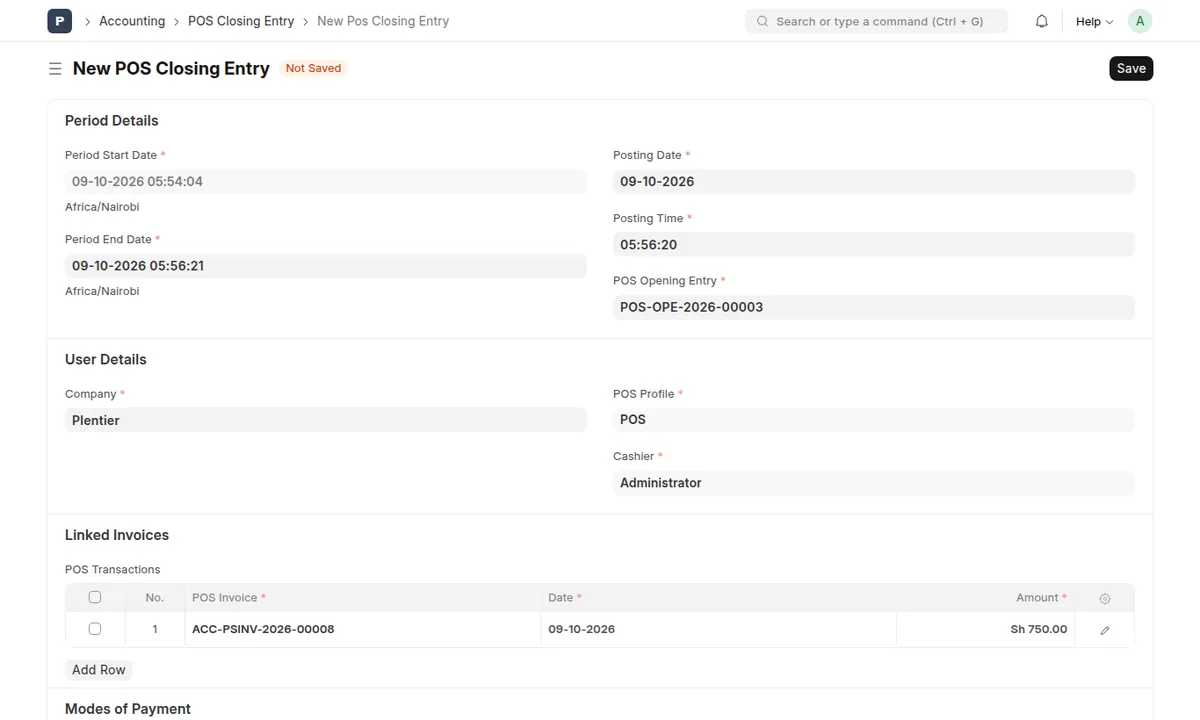
At the end of the shift, open the POS menu (the ⋯ button) and choose Close the POS. The closing entry lists every sale in the shift and the expected amount for each payment method. Count the drawer, enter the actual cash under Modes of Payment, and submit. Any difference shows straight away, and the shift's sales are posted to your accounts as sales invoices.
Step 8: Check your sales
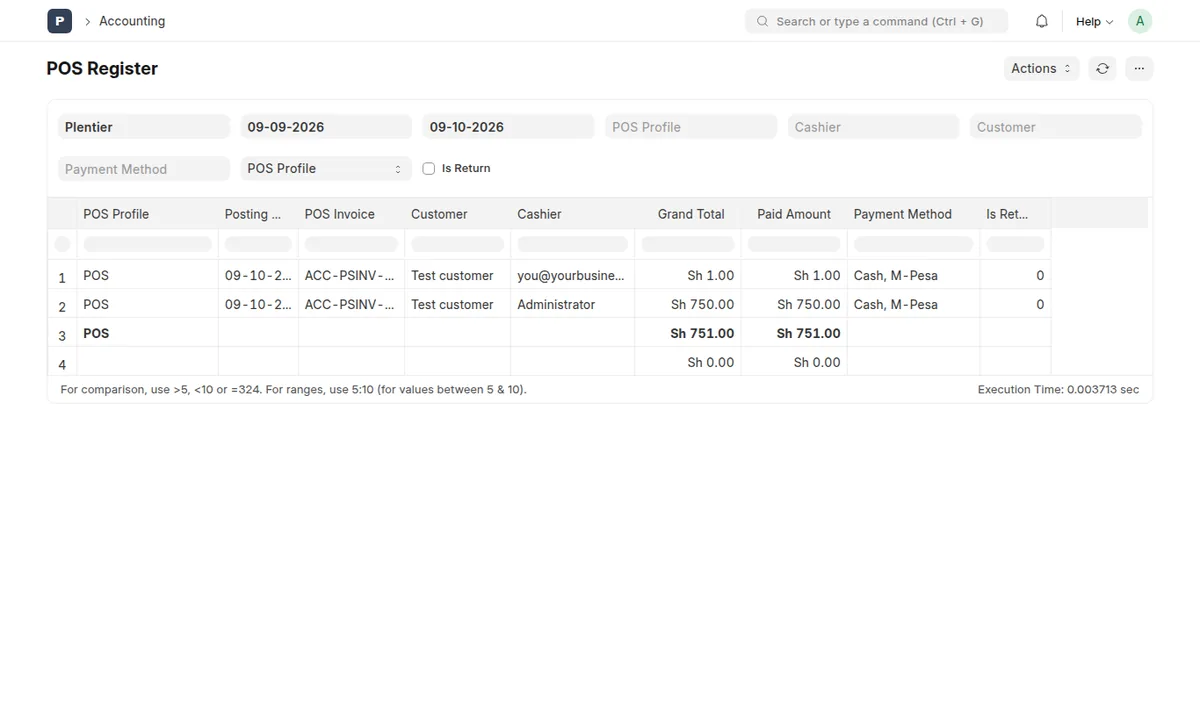
The POS Register report lists POS sales by date, cashier, customer and payment method, with totals. Filter by cashier or payment method to check a shift, or use the sales and stock reports for the bigger picture.
Troubleshooting
An item doesn't appear in the POS.
Check that the item is enabled and marked “Allow sales”, that its item group isn't excluded by the POS profile's item group filter, and, if “Hide unavailable items” is ticked, that it has stock in the profile's warehouse.
An item shows a price of zero.
The item has no price in the POS profile's price list. Open the item, set its Standard Selling Rate (or add an Item Price in that price list), then reload the POS.
The POS says there is no POS profile for my user.
Either no POS profile exists for the company, or the profile lists specific users under “Applicable for Users” and you aren't one of them. Add the cashier there, or leave the table empty so every user can use the profile.
The POS says the item is out of stock.
Stock items can only be sold from stock in the profile's warehouse. Record opening stock (on the item or with a Stock Entry), or untick “Maintain Stock” for items you don't count, such as services.
How do I refund a customer?
Open Recent Orders in the POS menu, select the sale and choose Return. Stock goes back to the shelf and the refund is recorded against the original sale, so the shift totals stay correct.
Can cashiers change prices?
Only if “Allow User to Edit Rate” or “Allow User to Edit Discount” is ticked in the POS profile. Untick both if prices should only change through the item or price list.
Good to know
- Internet: the POS runs in the browser and needs a connection to complete sales; a mobile data router makes a good backup line.
- Cashiers: each cashier logs in as their own user, so the number of cashiers follows your plan's user limit. See plans.
- More shops: create one POS profile per shop, each with its own warehouse.
About this guide
We wrote this guide by setting up the point of sale on our own Plentier ERP, using demo products, and every screenshot comes from that system. Email addresses are replaced with examples. If something here doesn't match what you see, tell us and we'll update it. More help: all guides · the Plentier POS.
Want your till selling this week?
Book a free, no-obligation consultation. We’ll review your goals and recommend a practical path forward, usually within one call.